Bitcoin Transactions QR Airgapped: How to Manage Bitcoin with Complete Security
Just because you’re paranoid doesn’t mean they aren’t after you.
(Joseph Heller, Catch-22)
Introduction
Among the various attack vectors a wallet can face, one of the most critical is the possibility that the device used to sign transactions is connected to the network. It’s certainly true that hardware wallets were designed to mitigate this risk, but there are some aspects that personally don’t leave me completely at ease.
Wallets like Ledger Nano or Trezor, for example, are theoretically isolated from the computer connected to the Internet, but in practice they are physically connected to it via cable. There is, therefore, an active physical connection, which raises a legitimate question: how can we be certain that malicious code can’t be injected from the web to the wallet? Moreover, we know that these devices often work through online tools, and in some cases (as with Ledger) applications are installed within the hardware wallet itself to manage specific blockchains.
Why I Don’t Trust Hardware Wallets
For these reasons, I decided to experiment with an alternative procedure, entirely air-gapped and based on Electrum, one of the most reliable and transparent wallets in the open source landscape.
The Structural Limitations of Ledger and Trezor
While it’s true that devices like Ledger and Trezor are considered secure, a fundamental problem remains: how can we be certain that the firmware installed on the device isn’t performing undocumented operations? An emblematic case is represented by Ledger, which introduced a backup phrase recovery function. This raised strong concerns in the community: if the device can send the seed elsewhere for “recovery,” then technically it could also send it to an attacker, or to whoever controls the software. Furthermore, Ledger’s source code is not public, so it’s impossible to know exactly how the system works internally.
It’s not just a matter of trust, but also of transparency and verifiability. For instance, the process of generating random numbers to create private keys should be sufficiently entropic; but if it were instead executed with a deterministic pattern, it could constitute a latent vulnerability in the future. In other words, we cannot know if one day a premeditated attack by “Mr. Ledger” could compromise users’ funds.
Trezor and the Verifiability Problem
The situation is partially different for Trezor, which publishes its source code. However, verifying that the code installed in the device exactly corresponds to that available on GitHub is not within everyone’s reach: it requires time, skills, and adequate tools.
Conclusion of the Premise
In the end, it might seem like an excessively paranoid discourse, but in computer security, paranoia is not a defect: it’s often the only true form of prudence. I’ve chosen to use Electrum, one of the most reliable and transparent wallets in the open source landscape. I’ve also chosen to transfer data exclusively through QR codes, completely avoiding the use of USB sticks or other external media.
My goal was to validate a secure, practical, and replicable method for signing a transaction offline, keeping the private keys on a device completely isolated from the Internet.
Threat Model Considerations
We can distinguish, at least broadly, different levels of security needs (or, if you prefer, different levels of paranoia):
- Minimizing exposure to malware: I want to be certain that my wallet for signing transactions cannot be infected by malicious code. This requires a clear isolation between the air-gapped device and any online system.
- Challenging trust in the wallet manufacturer: I want to overcome even the suspicion that the manufacturer itself might insert backdoors or undocumented functionalities in the firmware.
- Eliminating any direct communication channel: I want to ensure that there is no physical exchange (files, flash drives) between the online computer and the air-gapped device.
- Controlling key generation: I would like to be certain that the random numbers used to generate the private key are truly random, and not deterministic or manipulable.
In this post, I don’t directly address the last point: I assume that the software used (Electrum on Tails) generates the keys with an adequate level of entropy, conforming to standards. If one were not to rely on any library or software generator, the only alternative would be to resort to manual methods such as rolling dice or flipping coins, bit by bit (and even then, doubts would remain about how to correctly use the collected entropy).
However, regarding the first three points, I believe that the air-gapped flow with QR codes represents a good compromise between security and practicality.
Operating Environment: Android and a Live USB with Tails
The version of Electrum used in my experiment is 4.3.4, which corresponds to the one pre-installed in Tails at the time of writing. It would theoretically be possible to update it, but this would require the manual insertion of packages or binary files into a system designed not to maintain persistent data. Such an operation can compromise the reliability of the environment, so I preferred to avoid it.
It’s important to emphasize that the proper functioning of the procedure depends on the availability of a sufficiently updated version of Electrum. Versions that are too old might not support the PSBT format or the QR code encoding and reading functionalities necessary for the air-gapped flow.
To simplify the entire procedure, I decided to use an Android phone as the online device, installing the official Electrum app, and a laptop booted via Tails, a Linux distribution designed for security and privacy, used as an air-gapped wallet.
Tails is designed not to leave permanent traces on the system: everything is executed in memory, without writing anything to the disk, and the Internet connection can be completely deactivated. These characteristics make it particularly suitable for offline signing operations.
Here are some practical advantages I found in using Tails:
- No data persistence: at the end of each session, the system is reset. This reduces the risk that sensitive files or compromised configurations might persist.
- Verifiability: the Tails ISO image can be verified via GPG signature, ensuring the integrity of the system before each boot.
- Complete isolation: I manually deactivated all network interfaces. The private keys never had access to the Internet.
- Amnesic system: each boot starts from a clean and controlled environment.
- Immediate compatibility: Electrum is pre-installed in the standard version of Tails, facilitating the entire process.
How to Install and Use Tails
Tails (The Amnesic Incognito Live System) is a Linux distribution designed to preserve user privacy and anonymity. To install and use it, follow these steps:
-
Download the image: Visit the official Tails website and download the most recent ISO image.
-
Verify integrity: It’s essential to verify the signature of the downloaded image to ensure it hasn’t been tampered with. The Tails website provides detailed instructions for this operation.
-
Create a bootable USB: Use the program recommended by the Tails website (Etcher for Windows/macOS or dd for Linux) to create a bootable USB drive.
-
Boot from USB: Restart the computer and set the BIOS/UEFI to boot from USB. Generally, you can access the boot menu by pressing a specific key during startup (often F12, F2, or Esc, depending on the manufacturer).
-
Configuration: At first boot, Tails will guide you through some basic settings. For our purpose, it’s important to completely deactivate network connections after booting.
-
Using Electrum: Once Tails is booted, Electrum is available from the applications menu. No additional installations are necessary.
Remember that to maintain the air-gapped approach, it’s essential to boot Tails on a computer with the network deactivated or physically disconnected, and to verify that all network interfaces (WiFi, Bluetooth, etc.) are effectively disabled before generating or using the wallet.
What I Used
To facilitate the execution of the procedure, I used a laptop equipped with a webcam, on which I booted Tails, and an Android smartphone also equipped with a camera. Both devices must be able to display and scan QR codes with sufficient definition.
It’s important to note that this configuration is not currently replicable on iPhone, as Electrum is not available on iOS. The choice of Android was therefore also a technical necessity: at the time of writing, there are no official or reliable ports of Electrum for the Apple ecosystem.
- A laptop with Tails (air-gapped wallet)
- An Android phone with Electrum installed (watch-only wallet)
- The cameras of both devices to scan QR codes
- No physical connection between the two environments
The entire process took place without the exchange of files or the use of USB devices: only QR codes generated and read between screen and camera.
Creating the Offline Wallet
To view the extended public key (xpub) in Electrum, simply click on the “Wallet” menu and then on “Information”. From there, you can access the string in text format or, more usefully in our case, the related QR code.
I booted Tails on the laptop and opened Electrum, creating a new standard wallet. Once the seed was generated, I completed the verification and activated the display of the extended public key (xpub), generating the related QR code. This was the first and only “exit point” of data from the offline wallet.
Setting Up the Watch-Only Wallet
To correctly set up the wallet in watch-only mode on Android, you need to start creating a new wallet and select the option “Import a Bitcoin key or address”. At that point, you can scan the QR code containing the master public key (xpub) displayed on the offline device.
Electrum will thus import the public key and reconstruct the complete wallet in read-only mode, allowing me to monitor the balance, receive funds, and build transactions, while having no access to the seed or private keys.
On the Android phone, I launched Electrum and created a new wallet, choosing the option to import a public key. I scanned the QR code of the xpub displayed by the device with Tails.
Electrum reconstructed the wallet in watch-only mode, allowing me to monitor the balance, receive funds, and create unsigned transactions, without ever knowing the seed.
Receiving Funds
To test the complete flow, I transferred a small amount of Bitcoin to one of the addresses generated by the watch-only wallet. After a few confirmations, the balance was correctly visible.
Creating the Transaction
From the Android wallet, I initiated a new transaction, specifying the destination address and the amount. Electrum allows you to save the unsigned transaction in PSBT format and display it as a QR code. I used this function to display it on the phone’s screen.
Signing the Transaction Offline
On the device with Tails, I opened Electrum, selected “Load transaction → from QR code”, and scanned the QR shown by the smartphone. Electrum loaded the PSBT transaction, which I carefully examined before proceeding with the signature.
After signing, Electrum generated a new QR code containing the signed version of the transaction.
(At this point, I had a moment of satisfaction: I felt a bit like a secret service operator, albeit with less glamour and more QR codes.)
Why I Chose QR Codes Instead of a USB Stick
One of the main motivations that pushed me to use QR codes concerns the security profile. When using a USB support to transfer files between an online device and an air-gapped one, you inevitably introduce a physical attack vector. Malware present on the computer connected to the network – or in the firmware of the stick itself – is sufficient to compromise the offline device.
QR codes, on the other hand, completely eliminate this risk, as they don’t involve any physical contact between the two devices. The only shared element is the visual image of the code, displayed by a screen and read by a camera. Consequently, there is no channel through which the transmission of harmful code can occur.
This mode significantly reduces the attack surface, preserving the integrity of the air-gapped wallet while simplifying operational management at the same time.
Final Transmission
I loaded the signed transaction onto the Android wallet by scanning the QR code generated by the laptop with Tails. Electrum immediately recognized the data and, after a quick confirmation, I sent the transaction to the network.
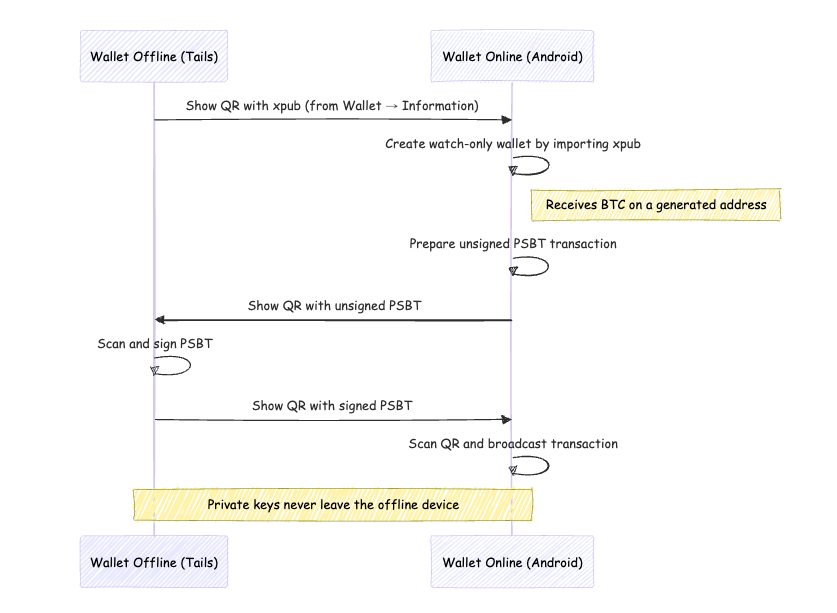
Flow Diagram
References
- Official Electrum guide for cold storage: https://electrum.readthedocs.io/en/latest/coldstorage.html
- Ledger and the Ledger Recover controversy: https://decrypt.co/140364/is-there-a-backdoor-in-ledger-hardware-wallets
- Malware and fake Ledger Live apps: https://www.techradar.com/pro/security/mac-users-beware-fake-ledger-apps-are-being-used-by-hackers-to-steal-seed-phrases-and-hack-accounts
- Attacks on air-gapped wallets: https://arxiv.org/abs/1804.08714
- The Dual EC DRBG generator issue: https://en.wikipedia.org/wiki/Dual_EC_DRBG
Conclusions
This experience has confirmed the solidity of the air-gapped approach, especially if enhanced with tools like Electrum and environments like Tails. The exclusive use of QR codes has simplified the process and strengthened security, completely avoiding the risk associated with the exchange of physical files.
I believe that this method is particularly suitable for those who wish to store Bitcoin securely for long periods, or for those who want to avoid purchasing hardware wallets without giving up a high standard of protection.
The entire process requires a minimum of technical skills and a certain operational discipline, but in exchange it offers an important guarantee: the private keys never left the offline device.