ERC-4337 Tutorial: A Step-by-Step Guide to Implementing Ethereum’s Account Abstraction
🆕 👉👉 This article has been superseded by a new tutorial on erc-4337 based on Infinitism 👈👈 .
Introduction
Welcome to the second part of our exploration into Ethereum’s groundbreaking ERC-4337 protocol. Having explored the theoretical underpinnings in our previous guide, we now turn our attention to the actionable side of this innovation. In this guide, we’ll walk you through the intricate process of creating and launching an ERC-4337-compliant smart contract, with a focus on using the Stackup platform. This article provide you with the practical know-how to effectively leverage ERC-4337’s capabilities, paving the way for enhanced account management on the Ethereum network.
How does ERC-4337 work? The Essential Components of Account Abstraction
-
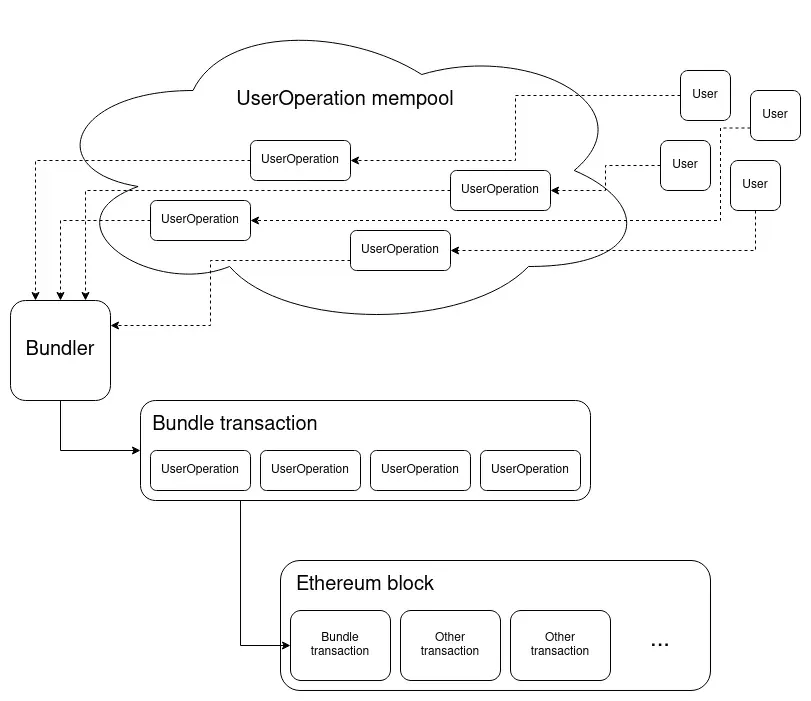
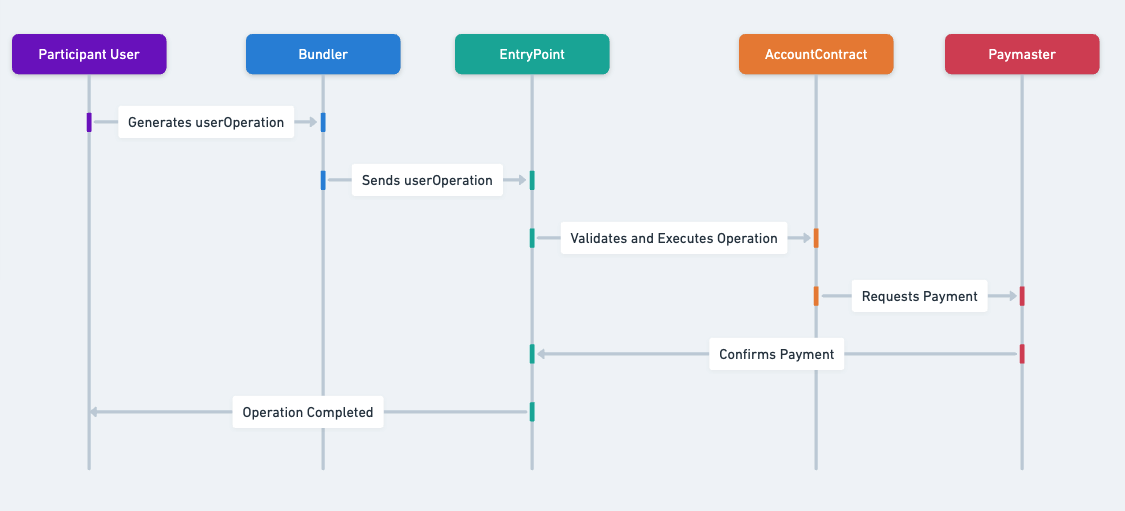
UserOperations: Consider these as your Ethereum account’s checklist, encompassing tasks like money transfers, smart contract interactions, or a mix of actions. Unlike the current Ethereum system where you execute each task separately, ERC-4337’s UserOperations lets you group various actions into one operation. You sign this combined operation, and the Ethereum network handles it. UserOperations maintain a structure akin to present Ethereum transactions but incorporate additional logic specific to ERC-4337.
-
Bundlers: After you’ve prepared your UserOperation, Bundlers are the ones who insert it into the Ethereum network. They act as intermediaries, gathering multiple UserOperations, bundling them, and then submitting them to the network. These can be validators or MEV searchers.
-
EntryPoint: This smart contract functions as the Ethereum network’s gatekeeper. When Bundlers submit UserOperations, the EntryPoint unpacks and executes them. If it finds an operation that doesn’t work, it can reverse the actions of that operation, maintaining transaction integrity and reliability.
-
Contract Account: Think of this as your automated helper in the Ethereum network. Different from standard accounts that require manual action initiation, Contract Accounts can autonomously execute actions as per the instructions they receive, like those from a UserOperation. They can interact with other contracts, manage assets, and make decisions based on their programmed logic, thus automating and simplifying complex Ethereum transactions.
-
Paymaster: An optional component that can cover transaction fees on behalf of your transaction. It pledges to repay the Bundler for gas costs. The conditions for this reimbursement are outlined in the smart contract.
-
Aggregators: These optional smart contracts work with the Contract Account to collectively validate signatures from multiple UserOperations.
In essence, ERC-4337 introduces new elements into Ethereum’s architecture, each playing a crucial role in the transaction process.
Requirements:
- Yarn software installed on your system
- Access to Stackup API Key: https://app.stackup.sh
- Stackup repository setup
- VScode Or Any code editor
- An operational terminal window for executing commands
SimpleAccount.sol: A Basic ERC-4337 Contract Illustration
Ethereum’s core team has developed a straightforward and minimal example of an ERC-4337 compliant contract, named SimpleAccount.sol
We will spend some time examining the code provided below. While it’s not necessary to replicate this code in a file, reviewing it will help us grasp its functionalities better.
Reviewing the Code: In-Depth into the SimpleAccount Contract
The SimpleAccount contract presented is configured to be managed by an external owner address. It’s tailored for interaction with an EntryPoint contract, adhering to the ERC-4337 guidelines. This setup enables the owner to initiate transactions without personally incurring gas fees. The contract employs OpenZeppelin’s libraries for enhanced features, such as cryptographic signature validation (ECDSA) and support for upgradeable contract models (UUPSUpgradeable and Initializable). Additionally, it incorporates BaseAccount and a callback handler. BaseAccount is pivotal, maintaining the nonce of the smart contract, verifying UserOperation payload, facilitating interactions with EntryPoint, managing execution payments (via payPrefund()), and providing a framework for tailored implementations of functions like _validateSignature(), _validateNonce(), and _payPrefund().
A key state variable, owner, retains the account’s owner address. _entryPoint is an immutable linkage to an external contract, designated as the EntryPoint.
Two principal functions, execute and executeBatch, are integral to this contract. They permit the owner or the relay system’s EntryPoint to dispatch individual or grouped transactions. These functions include safeguards, verifying that the initiator is either the EntryPoint or the owner, prior to executing any processes.
Upgradeability is a notable feature of this contract, allowing for the transition to a new owner. However, any modifications to the EntryPoint (like changes to _entryPoint) necessitate deploying a new smart contract account.
For practical application, we’ll utilize Stackup’s SDK, which simplifies deploying an ERC-4337 compatible contract. This enables us to efficiently execute operations such as approving ERC-20 tokens and managing ETH and token transfers.
Creating ERC-4337 Smart Contracts Using Stackup
In this segment, we focus on constructing an ERC-4337 compliant contract using Stackup This particular contract serves as an excellent foundational template for developers venturing into Account Abstraction with Stackup.
Setup the project
-
Begin by opening your terminal window and executing the following commands:
Setting up a local copy of an example ERC-4337 project from Stackup. Here’s a breakdown of each command:
git clone https://github.com/stackup-wallet/erc-4337-examples.git
- This command uses Git to clone repository . The repository contains example code for ERC-4337 projects developed by Stackup.
cd erc-4337-examples
- After cloning the repository, this command changes the current directory in your terminal to the newly created ‘erc-4337-examples’ directory. This directory contains the cloned project files.
yarn install
- This command uses Yarn, a package manager for JavaScript, to install all the dependencies required for the ERC-4337 project. These dependencies are specified in a file named ‘package.json’ in the project directory. Running
yarn installensures that you have all the necessary packages and their correct versions to run and work on the project.
Init the project folder
Moving forward, we’ll proceed with setting up our ERC-4337 contract. This is achieved by utilizing the initialization command provided by Yarn:
yarn run init
Upon running the initialization command, a config.json file is generated. This file contains important configuration values for your ERC-4337 contract, such as:
-
rpcUrl: This field specifies the Remote Procedure Call (RPC) URL, which is essential for supporting the methods invoked by the ERC-4337 contract. To populate this field correctly, you will require an API Key from Stackup. -
signingKey: This key is vital for creating signatures for UserOperations. It plays a dual role by also being used by the contract account for the validation of transactions. -
paymaster.rpcUrl: This URL is specifically for the Paymaster component of the ERC-4337 contract. It is crucial for the Paymaster to interact with the network and perform its functions. -
paymaster.context: This is a flexible field that varies depending on the specific Paymaster you are working with. It’s designed to hold any necessary contextual information required for the Paymaster’s operation within the contract.
Each of these fields plays a specific role in configuring the ERC-4337 contract, ensuring it operates correctly within the Ethereum network and interacts effectively with other components like UserOperations and Paymasters.
Generate an API Key for Stackup
Once the config.json file is in place, it’s time to input specific details like the RPC URL. Start by visiting:
https://app.stackup.sh/sign-in
and sign up for an account. After registration, you will be asked to choose a blockchain network. For this tutorial, opt for the Ethereum Sepolia chain. Click ‘Next’ to proceed. Following that, access your newly created bundler instance and select the ‘API Key’ option to obtain your key. Copy this API Key and return to your config.json file, where you’ll insert this key into the relevant rpcUrl fields.
The completed config.json file should resemble the following structure:
{
  "rpcUrl":
 "https://api.stackup.sh/v1/node/b5...16",

  "signingKey": "0xc3e72...",

  "paymaster": {
    "rpcUrl": "https://api.stackup.sh/v1/paymaster/8f92...",

    "context": {}
  }
}
Create Our Smart Contract Address
Now that our configuration is established, it’s time to generate a smart contract account, as specified in our configuration file. To do this, execute the following command in your terminal:
yarn run simpleAccount address
This command will produce an address, which is the identifier for the smart contract account you’re about to create. It’s important to note that at this stage, the smart contract account has not been deployed to the Ethereum network. However, generating this address is a crucial step, as it allows us to know the address of our smart contract account in advance. This preliminary step is essential for organizing and preparing for the subsequent deployment process of the smart contract.
After running the command, your terminal should display an output similar to the following:
$ ts-node scripts/simpleAccount/index.ts address
SimpleAccount address: 0x37662167966c7d2566b28ed8d4bea9d1d09d3ffd
 Done in 1.75s.
This output indicates that the command to generate the address for your SimpleAccount has been successfully executed. The address displayed (0x37662167966c7d2566b28ed8d4bea9d1d09d3ffd) is a randomly generated Ethereum address, which serves as a placeholder for the actual address that will be assigned to your smart contract account. The completion time of the process is also indicated, demonstrating the efficiency and quickness of the operation.
In the upcoming section, we will focus on adding funds to the SimpleAccount address that was just created. It’s important to remember, however, that the contract itself has not yet been deployed.
Add Funds to the Smart Contract Account Using a Faucet
Let’s proceed to add funds to the address of our smart contract account (for instance, SimpleAccount) that we generated previously.
To do this, you might utilize the QuickNode Multi-Chain Faucet. This allows you to obtain some testnet ETH, which you can initially send to your personal wallet.
From there, you can transfer it to the SimpleAccount address. Alternatively, if you already possess test ETH in a different wallet, you can directly transfer it to your smart contract (SimpleAccount) address, bypassing the need to use the Faucet initially.
Start a Transaction from SimpleAccount to a Different Address
Now that our smart contract account, such as SimpleAccount, is sufficiently funded, it’s time to perform a transfer from this account. We suggest ensuring that you have a minimum of 0.01 ETH available for testing an ETH transfer, keeping in mind the additional gas fees. To initiate this, input the following command into your terminal. Make sure to substitute the placeholder terms like {address} and {eth} with the actual values you intend to use.
yarn run simpleAccount transfer --to {address} --amount {eth}
The command provided is used to initiate a transfer of Ethereum (ETH) from your smart contract account (in this case, SimpleAccount) to another Ethereum address. Here’s a breakdown of its components:
-
yarn run simpleAccount transfer: This part of the command tells Yarn to execute thetransferfunction within thesimpleAccountscript. ThesimpleAccountscript is part of your project and is designed to interact with the SimpleAccount smart contract. -
--to {address}: This flag specifies the recipient’s Ethereum address for the transfer. You need to replace{address}with the actual Ethereum address of the recipient to whom you want to send ETH. -
--amount {eth}: Here,{eth}should be replaced with the amount of Ethereum you wish to transfer. This value is in ETH (Ethereum’s native cryptocurrency). For instance, if you want to transfer 0.02 ETH, you would replace{eth}with0.02.
It’s important to ensure that the SimpleAccount has enough ETH to cover both the amount you intend to transfer and the gas fees associated with the transaction. This command will initiate a transaction on the Ethereum network, transferring the specified amount of ETH from your SimpleAccount to the provided recipient address.
The process involves:
- Accepting the destination address (
t) and the amount of ether (amt) as inputs in the primary function. - Performing a verification for any middleware, which is particularly relevant if a paymaster is involved.
- Initializing a SimpleAccount contract utilizing the settings specified in the
config.jsonfile. - Parsing and processing the provided address and amount values.
- Signing the transaction and invoking the
executefunction with the aforementioned values. - Generating and returning both the UserOperation hash and the transaction hash as outputs.
Running the example
Our simple account was created at
0x1007a90Ac0962c46C108e908BCf7796B4b334196
It is worth noticing that until we require an user operation the account exists, it can acquire assets but the smart contract it is not yet deployed. It will be deployed in a lazy initialization only during the first operation handling.
We run the following
yarn run simpleAccount transfer --to 0xE2318e2bdE7d66DBB8C84C19aC8B56c55dEf2F9D --amount 0.0018
and as a result we obtain:
$ ts-node scripts/simpleAccount/index.ts transfer --to 0xE2318e2bdE7d66DBB8C84C19aC8B56c55dEf2F9D --amount 0.0018
Signed UserOperation: {
  sender: '0x1007a90Ac0962c46C108e908BCf7796B4b334196',
  nonce: '0x0',
  initCode: '0x9406cc6185a346906296840746125a0e449764545fbfb9cf000000000000000000000000686153b8e9a5c1833e79776c5ded768ba86333c10000000000000000000000000000000000000000000000000000000000000000',
  callData: '0xb61d27f6000000000000000000000000e2318e2bde7d66dbb8c84c19ac8b56c55def2f9d000000000000000000000000000000000000000000000000000665172898800000000000000000000000000000000000000000000000000000000000000000600000000000000000000000000000000000000000000000000000000000000000',
  callGasLimit: '0x4443',
  verificationGasLimit: '0x684eb',
  preVerificationGas: '0xc3bc',
  maxFeePerGas: '0xd779c219',
  maxPriorityFeePerGas: '0x3c05f0c9',
  paymasterAndData: '0x',
  signature: '0xa43e7a3d0c280e5d7d648490ef1d54db1ca71d4219b3e2a4cd15c958d98e13e93e3cad716f9cdf0ddb2a5db860a4bcccf0adb9fbe72fec4b1d19a3213e8ccbcb1c'
}
UserOpHash: 0xff218e48c3276dc7fac9022438a540f2209fa475281501800b6c1ce9af88f18d
Waiting for transaction...
Transaction hash: 0x32bf4ce09c13bed3ec089a56e044d519ab0560700621272257cacfa32b42a01f
✨  Done in 50.47s.
Gas considerations
The gas used by our transaction with the abstract account is 398899 which is very big compared with the 21000 usually needed for a eth transfer.
However in this specific case we have also “deployed” the smart contract account for the first time. Let’s make a second transfer to see the actual gas cost.
The second transaction (another send of 0.001 eth) is available here
https://sepolia.etherscan.io/tx/0xdd40202983674a950a775e64b75eda57da0c203ea6cb620609965a79fc2793e1
and the gas used is 87690. Still much higher than a plain old send from EOA, but somehow aligned with a regular ERC20 transfer.
The Transaction Process of a Smart Contract Account
This Ethereum testnet transaction stack trace outlines the sequence of operations for an ether transfer from an abstract account, presumably using Account Abstraction (AA) through ERC-4337.
If you want to follow step-by-step the execution trace of the transaction we suggest to check it in the great tool Tenderly directly from this link
Here’s a breakdown of the key steps reflecting the process and structure of this kind of transaction:
-
Operation Initiation: The sequence starts with the sender initiating a user operation. This sender is an abstract account, indicating that this account is a smart contract capable of initiating transactions on its own behalf, a core feature of Account Abstraction.
-
Handling Operations: The
handleOpsfunction is called, where an operation array (ops) is passed. This includes details like the sender, nonce,initCode,callData,callGasLimit,verificationGasLimit,preVerificationGas,maxFeePerGas,maxPriorityFeePerGas, and a signature. This data collectively describes the transaction to be executed, including the contract creation and execution details. -
Creating the Sender Account: Through a call to a factory contract (
SimpleAccountFactory), a new smart contract account is created for the sender if it doesn’t already exist. ThecreateAccountfunction is called with the owner’s address and a salt for deterministic contract creation usingCREATE2. This step is indicative of the first-time use of this abstract account. -
Validating and Preparing for Execution: Several internal validation steps occur, including checking reentrancy guards (
_nonReentrantBefore), validating prepayment (_validatePrepayment), and preparing user operation data (_copyUserOpToMemory,getUserOpHash). These steps ensure the operation is legitimate and the contract is ready to execute it. -
Prefunding the Operation: The transaction involves calculating the required prefunding (
_getRequiredPrefund) for the operation, ensuring that there are sufficient funds to cover the execution costs, including gas. -
Executing the User Operation: The core transaction, specified in the user operation’s
callData, is executed. This includes interacting with another contract (SimpleAccount) to perform the ether transfer. Theexecutefunction within theSimpleAccountcontract is likely called to facilitate this transfer. -
Signature Validation: The
SimpleAccountcontract validates the user operation’s signature to ensure that the transaction is authorized by the account owner. This step is crucial for security, ensuring that only valid transactions are executed. -
Transaction Execution and Error Handling: The operation attempts to execute the transfer (
_call). If the call fails (as indicated by aREVERT), the contract handles the error accordingly. This might involve logging the error or taking corrective action. -
Post-Operation Handling: After attempting the operation, the system handles post-operation tasks, which could include updating nonces, refunding unused funds, and logging the operation’s outcome. This ensures that the system’s state is correctly updated following the transaction.
-
Compensation and Cleanup: The transaction ends with steps to compensate the involved parties (if applicable) and clean up any temporary states or data. This might involve returning funds to the sender or paying out rewards to relayers or other intermediaries involved in the transaction process.
This transaction showcases the complex interactions and steps involved in executing a smart contract-based operation on Ethereum, particularly under the Account Abstraction model, where traditional wallet-based transactions are abstracted into more flexible smart contract operations.
Conclusion
You’ve successfully set up a smart contract account utilizing ERC-4337 and Stackup, and have also accomplished a fund transfer from this account to a different address. While this procedure might appear straightforward and achievable with or without ERC-4337, it’s important to recognize the broader scope of opportunities that ERC-4337 brings to the table. This includes the ability to have transactions with sponsored gas fees and the capacity to handle batched transactions, opening up a new realm of functionalities and efficiencies in your smart contract interactions.